Over three million businesses all over the world actively advertise on Facebook.
This is hardly a surprise, as Facebook Ads allows you to tap into over 2 billion users! If you’re reading this, chances are you want to take a stab at Facebook Ads for your business. In this article, we’ll walk you through setting up your account, creating effective ad campaigns, and using Facebook’s tools to analyze and improve your advertising methods.
Facebook Structure
Before we get into the nitty gritty of Facebook Ads, it is important to understand the hierarchy that Facebook operates on. The Metaverse can be a very confusing and ever-changing space, so we’re giving you this graph to reference as you navigate through the rest of this article!

Creating Your Facebook Ads Account
If you have already set up your Facebook Ads Account, good job! You can skip to the next section. As for the rest of you, here’s your guide to getting started in the Metaverse.
Step 1: Create Or Get Access To Your Business Page
Before starting the process of setting up your Facebook Ads account, you will need to either create a new Facebook Page or get admin access to your business’s existing page. If you already have this, you’re good to go to the next step! Otherwise, you can follow these steps to create your page.
Step 2: Create A Business Manager Account
Referring to the diagram from the previous section, you can see that a Business Manager account allows you to group your Ad Accounts, Pages, Pixels, and more all in one house.
To create a Business Manager, you will navigate to business.facebook.com/overview and click “Create Account.” Once there, you will enter your business name and work email address and click “Next.” Finally, you will enter your business details and click “Submit.”
Now that you have a Business Manager, you are ready to start adding people (check out “User Permission Levels” in the “Tips & Tricks” section), pages, and ad accounts for easier management and integration!

Step 3: Create Your Ad Account (Or Add/Request Access)
There are 3 ways to add ad accounts to your Business Manager. The first two ways are only if you have existing accounts for your business, so we will just be covering the third, which is creating a new ad account. Before you do this, it is important to understand that once you tie an ad account to a Business Manager, you cannot transfer it to another account.
To create a new ad account, go to “Business Settings” > “Accounts” > “ Ad Accounts” and click on the blue “Add” dropdown menu. You will then choose “Create a new ad account” and follow the instructions from there to set it up!

Step 4: Add Your Business Page To Business Manager
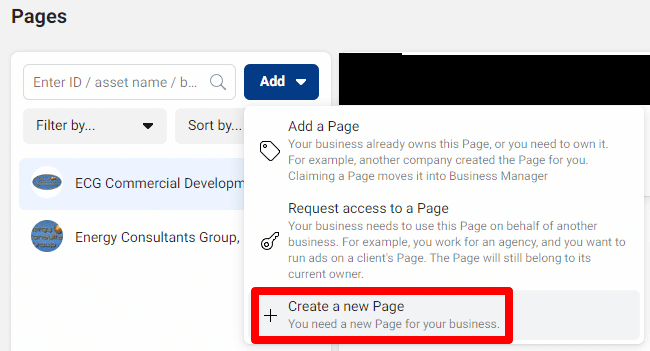
To make sure you can advertise with the name of your Business Page through your new ad account, you will want to add your Page to Business Manager as well. To do so, navigate to “Business Settings” > “Accounts” > “Pages” and click on the blue “Add” dropdown menu. Select “Add a Page”, enter your business page’s URL, and click “Add Page.” You should be able to see your Page now listed on the next screen!
Setting Up Your First Campaign
Step 1: Select Your Campaign Objective
We all know the importance of setting goals before a marketing campaign. Whether you’re looking for new leads, an increase in sales, website traffic, or anything else, Facebook is sure to have a campaign for you.
The first thing you need to do is navigate to Ads Manager and click “+ Create”. You will be prompted with the option to choose the buying type and campaign objective. To make things simpler in this article, we will be focusing specifically on the “Auction” buying type and its 6 campaign objective options. To help you in your decision to find an objective that aligns with your business goals, below is a quick summary of each one!

- Awareness:
- Definition: This objective will help you reach the largest number of people that Facebook determines will remember your ad.
- Example Uses: This objective would be especially useful for new businesses that are trying to get their name out there and become more familiar in your area.
- Traffic:
- Definition: This objective will show your ad to people that are most likely to click on the link to your website. While narrower down the purchase funnel than Awareness, this objective does not take into account who would most likely take action once on the page.
- Example Uses: This would be great for a business wanting to direct people to specific pages or promotions on their website, especially to create new audience segments that they will use to retarget later.
- Engagement:
- Definition: This objective finds people who are more likely to engage with your business on Facebook. This would include messages, video views, post engagement, Page likes, or event responses. If you are looking for users to take immediate action such as purchase or sales, this objective is not for you.
- Example Uses: We like to use this objective with businesses that want to make their businesses more popular on social media and create a Facebook community of interested customers. This objective is especially popular for non-profits that need to create a base of supporters that will be interested in their Facebook Fundraisers and Events.
- Leads:
- Definition: This objective shows ads to people who are most likely to take valuable actions such as phone calls, lead forms, or sign-ups.
- Example Uses: This objective is great for any business that is looking for customers who are already aware of their service and ready to inquire. We specifically use Leads in our retargeting campaigns, using audiences that have come to the website through previously ran Traffic campaigns.
- App Promotion:
- Definition: This objective shows ads to people who are more likely to download or take specific actions on your app. It will direct users without your app on their phone to the App Store or Google Play Store.
- Example Uses: This objective is not only great for businesses who need to get more downloads but for businesses encouraging their current app users to make an in-app purchase or try a new feature.
- Sales:
- Definition: This objective finds the people who are most likely to purchase your goods or services.
- Example Uses: We would recommend this objective specifically to businesses with eCommerce sites that are aiming to increase purchases.
Once you find the objective right for your business, go ahead and click “Continue” to move on to the next step!
Step 2: Customize Your Campaign Settings
The first thing you should do on this level is name your campaign. To stay organized, we recommend following a name structure similar to this:
- Campaign: “Promotion Title | Campaign Objective”
- Ad Set: “Promotion Title | Campaign Objective | Audience”
- Ad: “Promotion Title | Campaign Objective | Audience | Creative Type”
- Ad Set: “Promotion Title | Campaign Objective | Audience”
(You’ll thank us a year from now when you have a million different campaigns and are always able to find the one you are looking for😉)
The next setting you will find is titled “Special ad category.” You only have to worry about this setting if you want to create an ad campaign related to credit, employment, housing, social issues, elections, or politics. If you choose one of these categories, we won’t get into the subsequent policies that follow, so check out this page for more special category info. You also have the option to create an A/B test at the Campaign level, which you can find out more about here.
The next choice you will have is whether or not to turn on “Advantage campaign budget.” Turning this on allows you to control and optimize your budget at the Campaign level rather than each individual Ad Set level. This is useful if you are planning on running a lot of ad sets to test out different audiences, and want Facebook to direct your budget to what it deems the most successful. If you are only planning on creating one ad set, you can ignore this setting altogether.
Once you have these settings in order, click “Next” to be taken to the Ad Set settings!

Step 3: Customize Your Ad Set Settings - General
Firstly, just like in our Campaign settings, you will give your Ad Set a name that is unique and organized. The following setting, Conversion, will differ depending on the objective you chose for your campaign, but for simplicity, we will follow the steps for a Traffic campaign. The Conversion setting allows you to choose where you would like users to be sent after clicking your ad: Website, App, Messenger, WhatsApp, or Calls. Most of the time we would recommend choosing “Website” for Traffic campaigns, as this option brings users straight to where they can learn more about your business.
The “Dynamic Creative” section contains a switch that when turned on, allows you to provide a multitude of different assets for Facebook to automatically test and optimize. This setting is useful when you do not have the budget or time to run your own A/B tests but still want some semblance of testing going into your ads.

You will next choose what event you would like to optimize for under “Optimization for ad delivery.” If you’re unsure what to choose here, we would recommend starting with link clicks so your ads will show to the people who are most likely to click on them! You can then set a cost-per-result goal if you are comfortable, but in most cases, you want to wait until you have an idea of what your average acquisition cost is.
Now for the less complicated part, setting your budget and schedule. You can choose from a daily or lifetime budget and spend as little as $1.00 per day per ad. Make sure to set an end date if you don’t plan on continuously running your campaign! Additionally, if you set a lifetime budget, you have the option to run your ads at specific times and days by going to “Show more options”

Step 4: Choose Your Ad Set Audience & Placements
Hooray! You’ve made it to choosing your audience (finally). To make it easier for you, below is the list of audience settings you can use along with advice for each one!
- Locations: You can target your audience by global regions, countries, states/regions, cities, postal codes, addresses, or Designated Market Areas ®. If you choose to target cities, I would recommend targeting a 25-mile radius around the city/cities you serve to accommodate those that are within a reasonable driving distance.
- Age: You have the option to target age ranges from 13 all the way up to 65+. If you aren’t quite sure what the age of your target audience is yet, keep the setting at 18-65+ and keep an eye out for which age ranges are responding to your ads the best once you launch your campaign.
- Gender: Most of the time, we keep this setting to “All” unless we are 100% positive that either men or women are the majority of our audience.
- Detailed Targeting: Below are the categories of detailed traits that you can choose to either include or exclude when defining your audience.
- Demographics: Define your audience with things such as education level, relationship status, household income, job titles, and more. For example, if you are advertising for a higher-priced product you may want to specify “Household income: top 10%-25% of ZIP codes (US)”.
- Interests: Target your audience by interests, activities, and Pages they have liked. For example, if you are marketing your physical therapy business, you may choose to show your ads to those with interests in running, physical exercise, or sports in general.
- Behaviors: Reach people based on their purchase behavior or intents. For example, if you own a jewelry store you may want to target your ads to those with an anniversary within 61-90 days.
- Languages: Only use this targeting setting if you are advertising to people who use a language that is not common in your location.
- Custom Audiences: We will go into more detail on this feature under “Retargeting” in “Tips & Tricks”!
Once you are done customizing, you can save your audience for future use in future campaigns by clicking “Save this audience” and giving it a descriptive and unique name.

Overwhelmed by your options or not quite sure who your audience is? No problem! You can start with an open audience and rely on Facebook’s algorithm to narrow your customers down for you. If keeping your audience open, make sure to check in on ad performance regularly to see which demographics, locations, and detailed targeting traits are doing the best so you can customize your audience in the future.
Finally, you have the choice of where to allow Facebook to show your ads. Now, unless you are vehemently against your creative showing up in certain placements, we recommend sticking to the default setting, “Advantage+ placements,” to be able to show your ads to more of your target audience using Facebook’s delivery system.

You are now ready to start creating your ad! Click “Next” to continue.
Step 5: Create Your Ad
While this article may sound like a broken record, you want to make sure to give your ad a unique name that follows the structure of your campaign and ad group names! Next, you want to make sure that you choose your business’ Facebook and Instagram Page so your ads show up under the right identity.

Once you reach the Ad setup section, the first thing you need to do is choose whether you are creating a new ad, using an existing post from your business, or using Facebook’s Creative Hub. For the purposes of this article, we will go with “Create ad” to walk you through the default steps!
For your creative source, choose “Manual upload” unless you have a catalog you would like to use (we will go over this under “Ecommerce To The Stars” in “Tips & Tricks”). With standard ad creation leading to your website, your options for ad format are “Single image or video”, “Carousel”, or “Collection”. We most commonly use video or carousel, as both of them tend to do better with our audiences than your standard, static image. (If you need help creating video assets, Aelieve has plenty of incredible videographers at your disposal!)

After uploading your images and/or videos, you now need to write some ad copy! You can write up to 5 primaries, 5 headlines, and 5 descriptions for Facebook to optimize for you. Technically, it’s only required that you write one of each, but we highly recommend doing at least 3 of each for better chances that one is a hit!
There is also the option to optimize text per person, which gives Facebook the permission to mix and match based on what they think a specific audience member will most likely interact with. We normally turn this on, as personalization is a great way to increase your chances of a lead.

Choosing your call to action is the next step, and it is more important than you think. To help you out with this, below is a list of Facebook’s Call To Action options available for the Website Traffic objective and example cases of each:
- Apply now: Jobs, Appointments, Quotes
- Book now: Appointments, Quotes, Meetings
- Contact us: Calls, Lead Forms, Booking Appointments
- Donate now: Fundraising Campaigns
- Download: Apps, Newsletters, Flyers
- Get offer: Online or In-Store Sales, Gift Cards, Discounts, Etc.
- Get quote: Quotes, Appointments
- Get showtimes: Concerts, Plays, Musicals, Movies
- Listen now: Music, Podcasts
- Order now: Specific Products, Sales Offers
- Request time: Appointments, Quotes, Meetings
- See menu: Restaurant Menu, Service Options List
- Shop now: Online or In-Store Products
- Sign up: Newsletters, Quotes, Appointments, Auditions
- Subscribe: Newsletters, Email Lists, Text Notifications
- Watch more: Trailers, Commercials, Video Offers
- Learn more: Pretty much EVERYTHING else
And remember, when in doubt, choosing “Learn More” can never hurt to attract customers to click to your website!
Next, you will want to fill out the ad destination with the page on your website most relevant to the ad. Ideally, the page you choose should contain some sort of obvious action for the customer to take, whether it is a contact form, a specific online product to buy, a newsletter sign-up form, etc. You increase your chances of a successful conversion if you make the action, clear, obvious, and easy to perform.
Additionally, you can choose to add a call extension to your ad, which simply means when a user clicks on your website, there will be a button displayed below that allows people to click to call your business immediately.

Finally, you will arrive at the tracking section, where you want to make sure to select the correct Facebook Pixel linked to your business’ website.
And that’s it! You are now ready to click Publish!
Step 6: Track Your Results & Optimize
After clicking publish, it can take Facebook anywhere from a few minutes up to a couple of days. If it’s been 48 hours and your ads are still stuck in review, you can always try editing and resubmitting them.
Once your ads are running, make sure you stay on top of tracking their results and looking for ways to improve them. The key performance indicators (KPIs) that I make sure to keep an eye on are Cost Per Link Click (CPC), Cost/Conv., and Click Through Rate (CTR). You can even use Facebook’s “Breakdown” menu to see how specific times, audiences, ad copy, & more are performing to better optimize your campaign!
Helpful Tips & Tricks
1. User Permission Levels🔑
The permission system on Facebook can be a big hurdle to hop over for any newbies, so this section will walk you through how to give your employees and coworkers access! The first step you should take is to add them to your Business Manager. To do so, go to “Business settings” > “People” > “Add” and enter the work email address of said person. You will then choose to give them Employee or Admin access. Employee access will only allow them to work on the accounts and tools you allow them to have access to. Admins, however, have full control over everything in the Business, including settings, people, and adding/deleting assets. We highly recommend assigning most people as Employees and reserving the Admin Access for 2-3 trusted and experienced workers.

Since Business Manager uses a 2-layer permission system, you will use task-based permissions to grant users access to your pages, ad accounts, and more. For example, you can add someone to your Business Manager with employee access, then grant them access to create ads but not publish to the Facebook Page, or vice versa.

2. eCommerce To The Stars⭐
If you are an eCommerce business, this section is a must-read! Facebook has an intuitive platform that allows you to upload your products to a catalog and dynamically advertise. To start, you will want to navigate to Commerce Manager using the hamburger menu in Ads Manager.

From here, you will be able to start creating your first catalog by clicking “Get started” > “+ Add catalog”. After filling out the type of inventory your store offers, your next step is to choose whether to upload product info manually or connect to a partner platform like Shopify or BigCommerce. We highly recommend going through your eCommerce partner, as Facebook will automatically sync any updates or changes from your partner platform on a regular basis!
Once you have uploaded your product catalog, you unlock the ability to advertise your products! We highly recommend starting out with an Advantage+ catalog ad, which uses Facebook’s machine learning. This type of ad displays products that it deems relevant to specific users based on their interests, intent, and actions. This makes it incredibly easy to manage even the largest volume of products!
3. Retargeting - Turn Those Window Shoppers Into Buyers🛒
If you are looking to run ads that target users who have interacted with your brand before, creating a custom audience will be your first step! To do so, you will need to navigate to “Audiences”> “Create Audience” > “Custom Audience”. You will then see a multitude of sources to choose from, including Website, App activity, Catalog, Instagram Account, and more! We recommend creating a variety of audiences when you first start out, even if you don’t plan on running a retargeting campaign yet. That way, your audiences have time to build up and will be ready to use whenever you are!

Hire The Social Ads Experts At Aelieve
Now, after all of that, you may be thinking, “How am I supposed to do this all on my own while running my business?” Not to worry, we’ve got you covered.
Aelieve Digital Marketing is well-versed on every social platform from Facebook to TikTok to Twitter. We provide you with social ads experts who have managed hundreds of clients’ campaigns successfully. They will make sure your ads are fully optimized with great ad copy, eye-catching graphic design, thorough A/B testing, conversion tracking, and more!
To learn more about our social media advertising services, you can request a free quote or call us today at (319) 251-2076 to speak with a specialist!

